
What storage can I request?
Research Computing provides storage solutions for researchers and their active computational work. Users on Rivanna/Afton are given access to a personal Home folder and a Scratch folder for their work. Users on Ivy are given a Home folder and 1TB of shared storage for the project. If this storage is not sufficient, Research Computing offers two tiers of leased storage that can be shared amongst a group: Research Standard and Research Project Storage. See our Storage page for more information about storage on our system.
Using the resource portal, PIs can request leased storage for both their Standard Security Zone (Rivanna/Afton) and High Security Zone (Ivy/Rio) projects.
Who can request storage?
Only eligible PIs can request new or modify storage on their projects. If you are not eligible, you will not see the option to create a new project, and thus cannot request storage for the project. All users can use the tool to visualize their projects and resources granted to them.
Requesting SSZ Storage
Step 1: Request an Allocation
You will need an active project with an Allocation to receive an account on our system. This is required to access the storage. See our guide on Requesting a Compute Allocation.
Step 2: Sign Up
Before you can request storage, you must agree to our terms of service.
After logging in, it will be toggled to show only the services you've already signed up for. To see the services you haven't signed up for yet, click 'Toggle to view available resources'
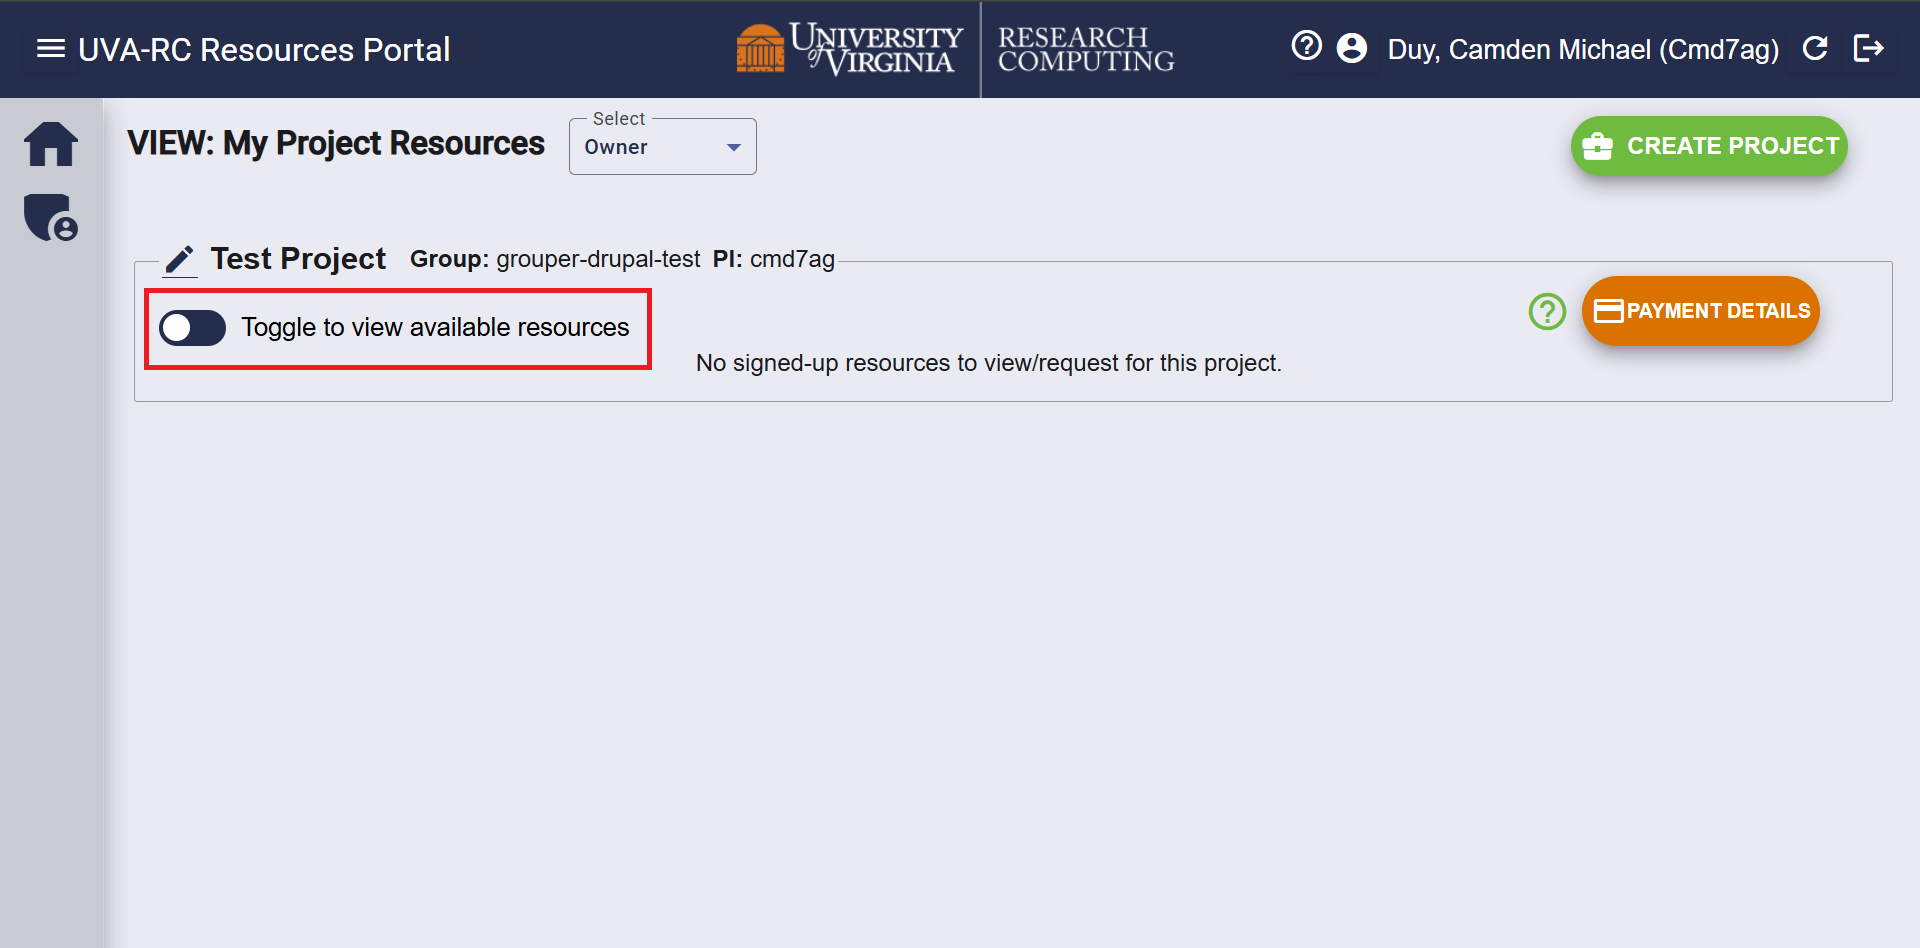
Then, click the Sign-Up button within the Actions column of your project and read and accept the terms. Signing up is separated by the tier of storage. Double-check that you are requesting the correct storage in the Resource Type column.
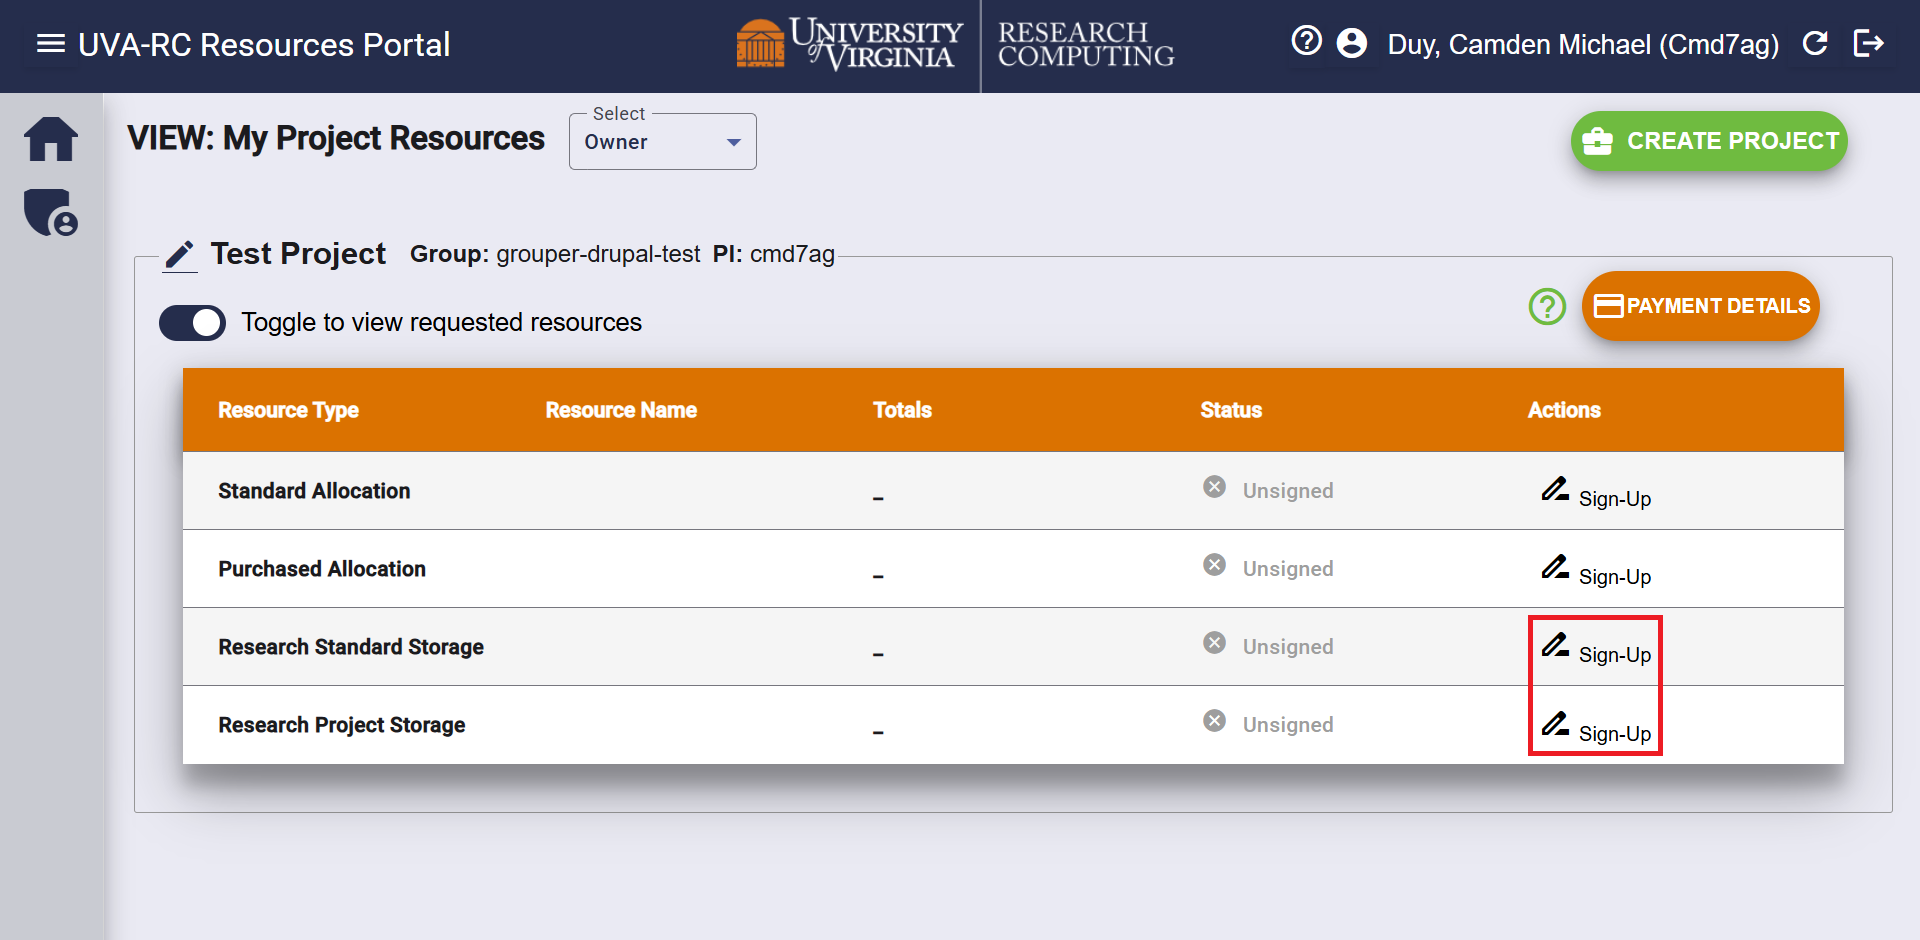
Step 3: Request Storage
After signing up, select it from your list of available resources using Use/View.
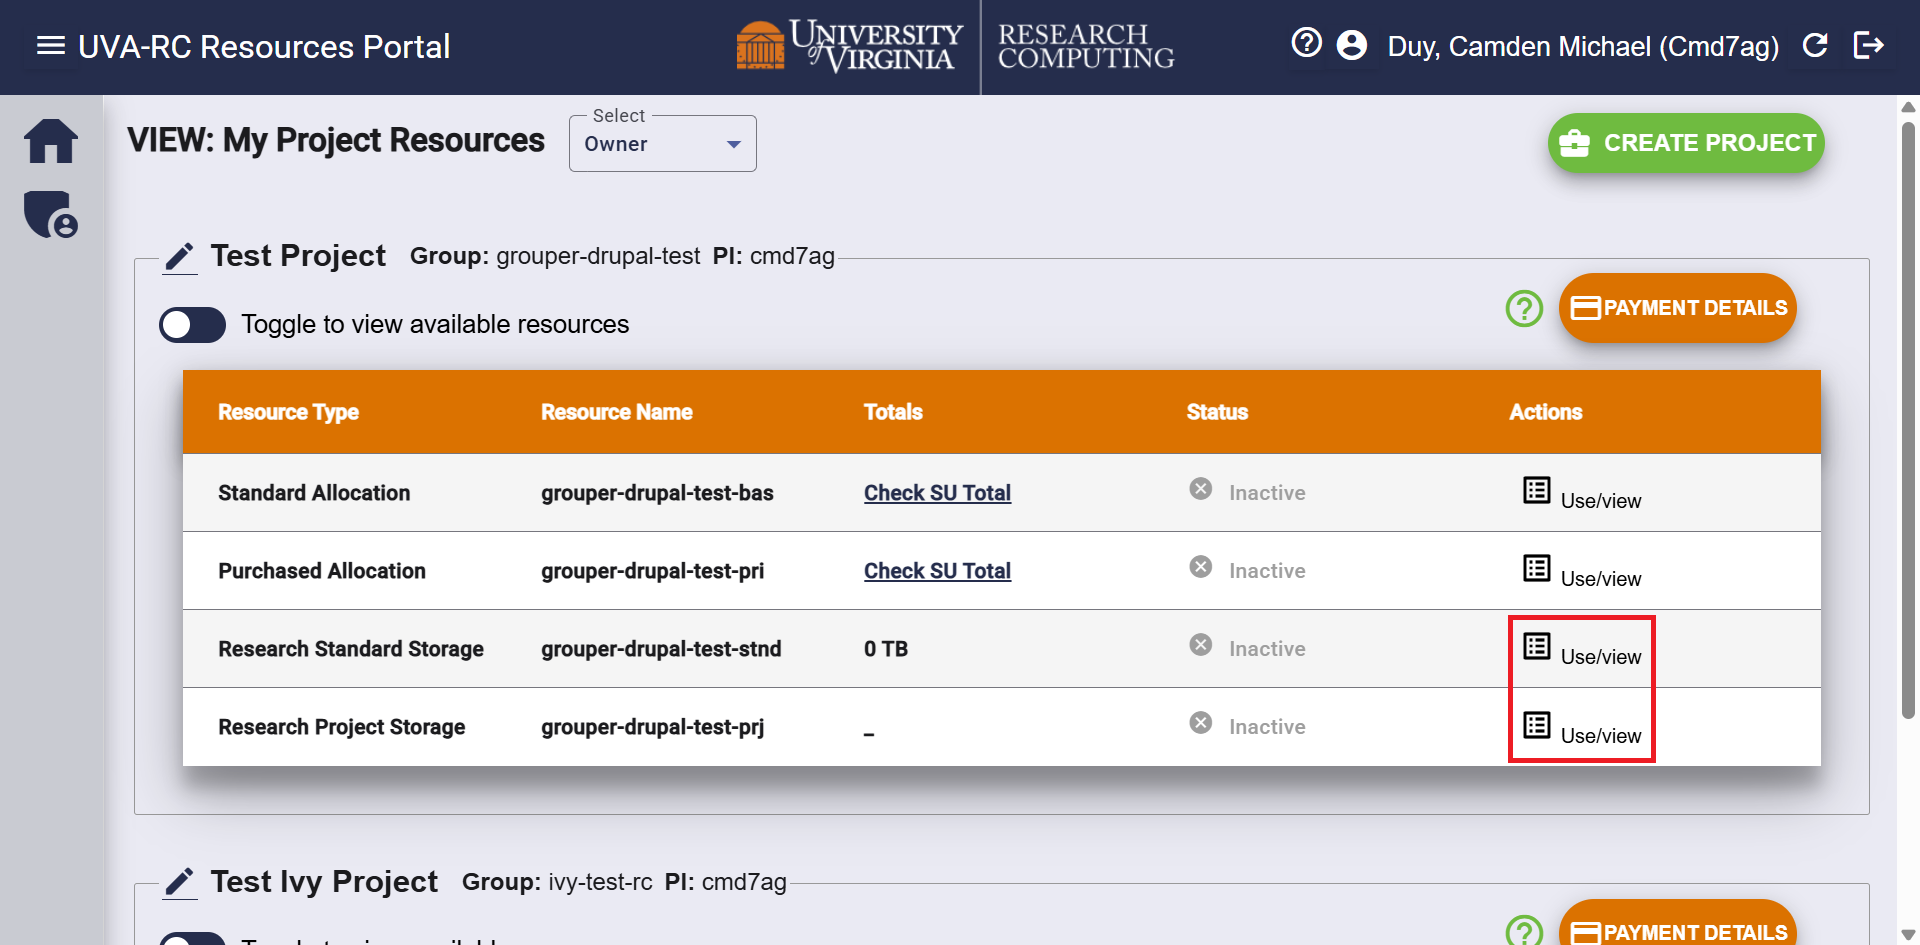
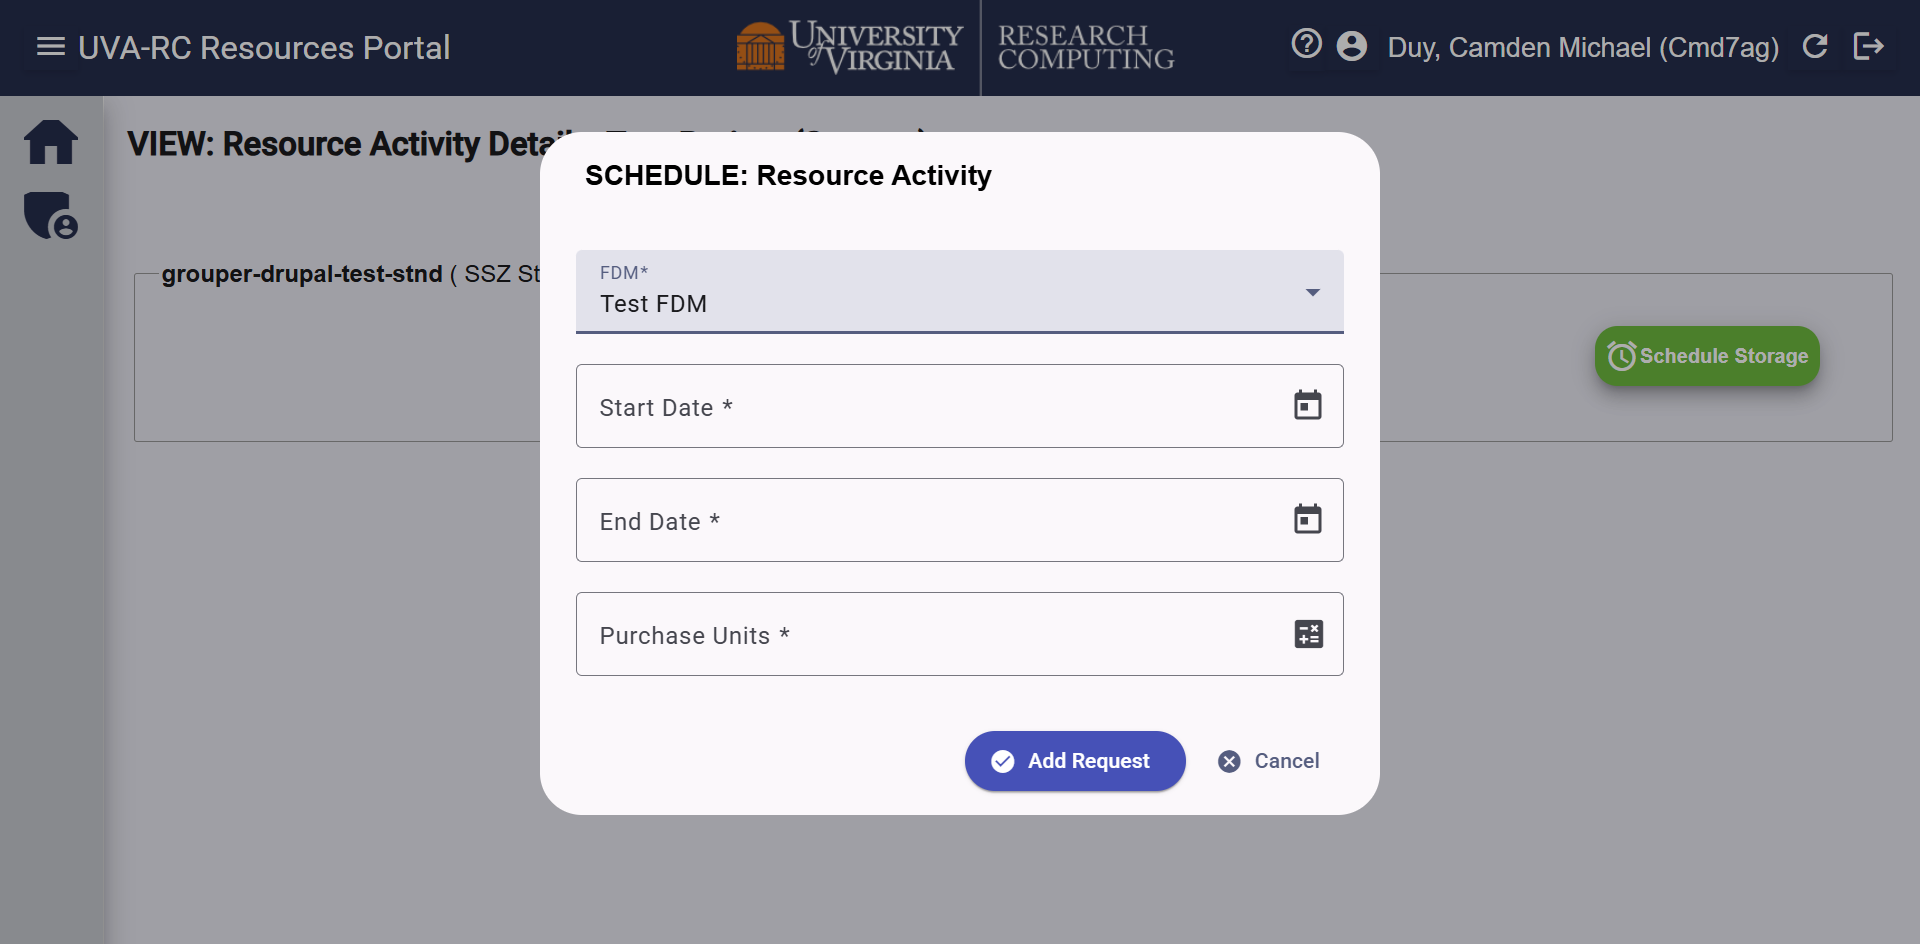
Select the green Schedule Storage button. In the form, provide the following information:
- Pick an FDM from the dropdown
- Note: All projects will have access to an FDM titled No Charge RC FDM. PIs are eligible for up to 10TB of Research Standard Storage at no cost. Use this FDM if you want to request this at no cost. The form will give you an error if you request more than 10TB, or if you have other storage using this FDM up to 10TB.
- A start date
- An end date
- Enter the amount of storage in Gigabytes (GB) you are requesting as Purchase Units
- Alternatively, you can click the calculator icon at the far right of this field. This will open a field where you can add the number in Terabytes (TB), and automatically convert the number to GB. This may be more convenient, since quota is displayed in TB on our system.
After submitting the request, it automatically generates a ticket for our user support team to verify. Once we've provisioned the storage, you will receive a notification from us, and the Status will switch to Active on the portal.
To return to the view of your project resources, click on the home icon in the left margin.
Step 4: Accessing Your Storage
You can access the storage by Logging In to the HPC cluster. The path to your storage will depend on whether you request Research Standard or Research Project storage:
- /standard/<group-name>-stnd
- /project/<group-name>-prj
Replace <group-name> with the name of your Grouper group for the project.
Requesting HSZ Storage
Step 1: Request a Project
The resource portal does not support project creation for Ivy/Rio at this time, but it can be used to request and manage High Security Storage. Follow our HSZ Getting Started guide to request a new project in that security zone.
Once you have an HSZ project, it can be linked to the resource portal. Follow our Create a Project guide, where you will find your Ivy group name in the dropdown. It should be named ivy-xxx-xxxxx, and can be verified on your project page in the Services App (VPN required).
Step 2: Sign Up
Before you can request storage, you must agree to our terms of service.
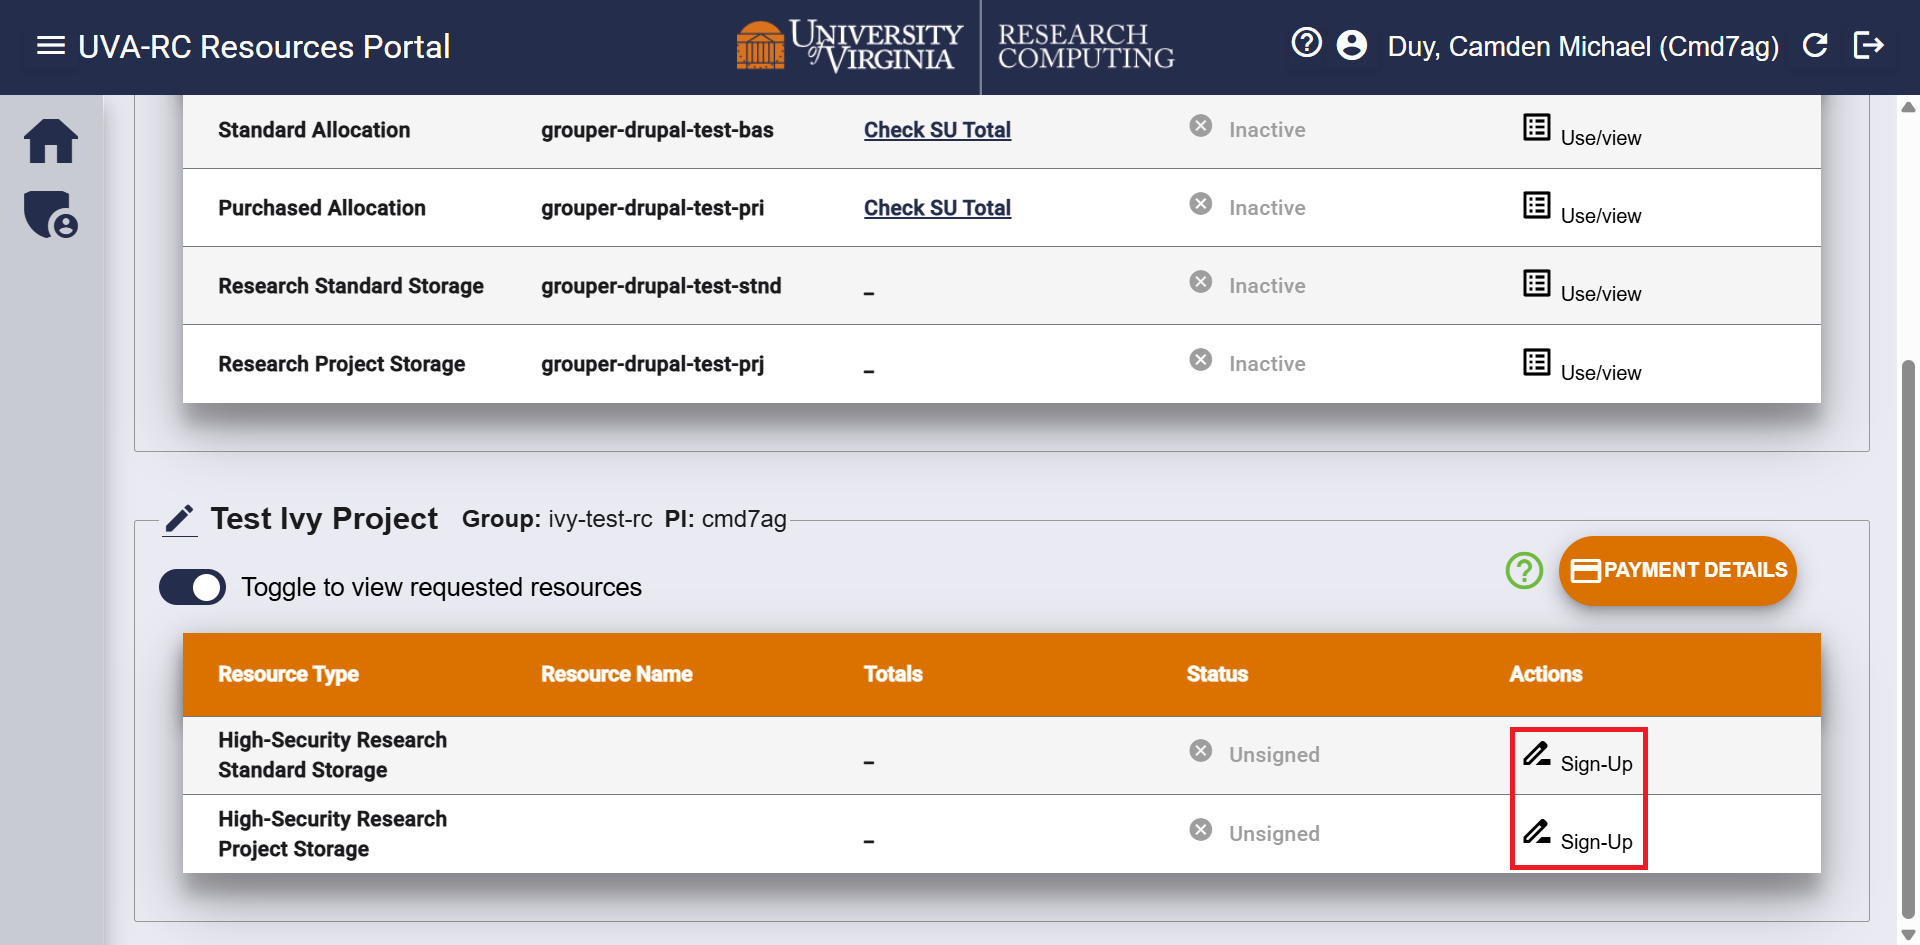
After logging in, it will be toggled to show only the services you've already signed up for. To see the services you haven't signed up for yet, click 'Toggle to view available resources'
Then, click the Sign-Up button within the Actions column of your project and read and accept the terms. Signing up is separated by the tier of storage. Double-check that you are requesting the correct storage in the Resource Type column.
Step 3: Request Storage
After signing up, select it from your list of available resources using Use/View.
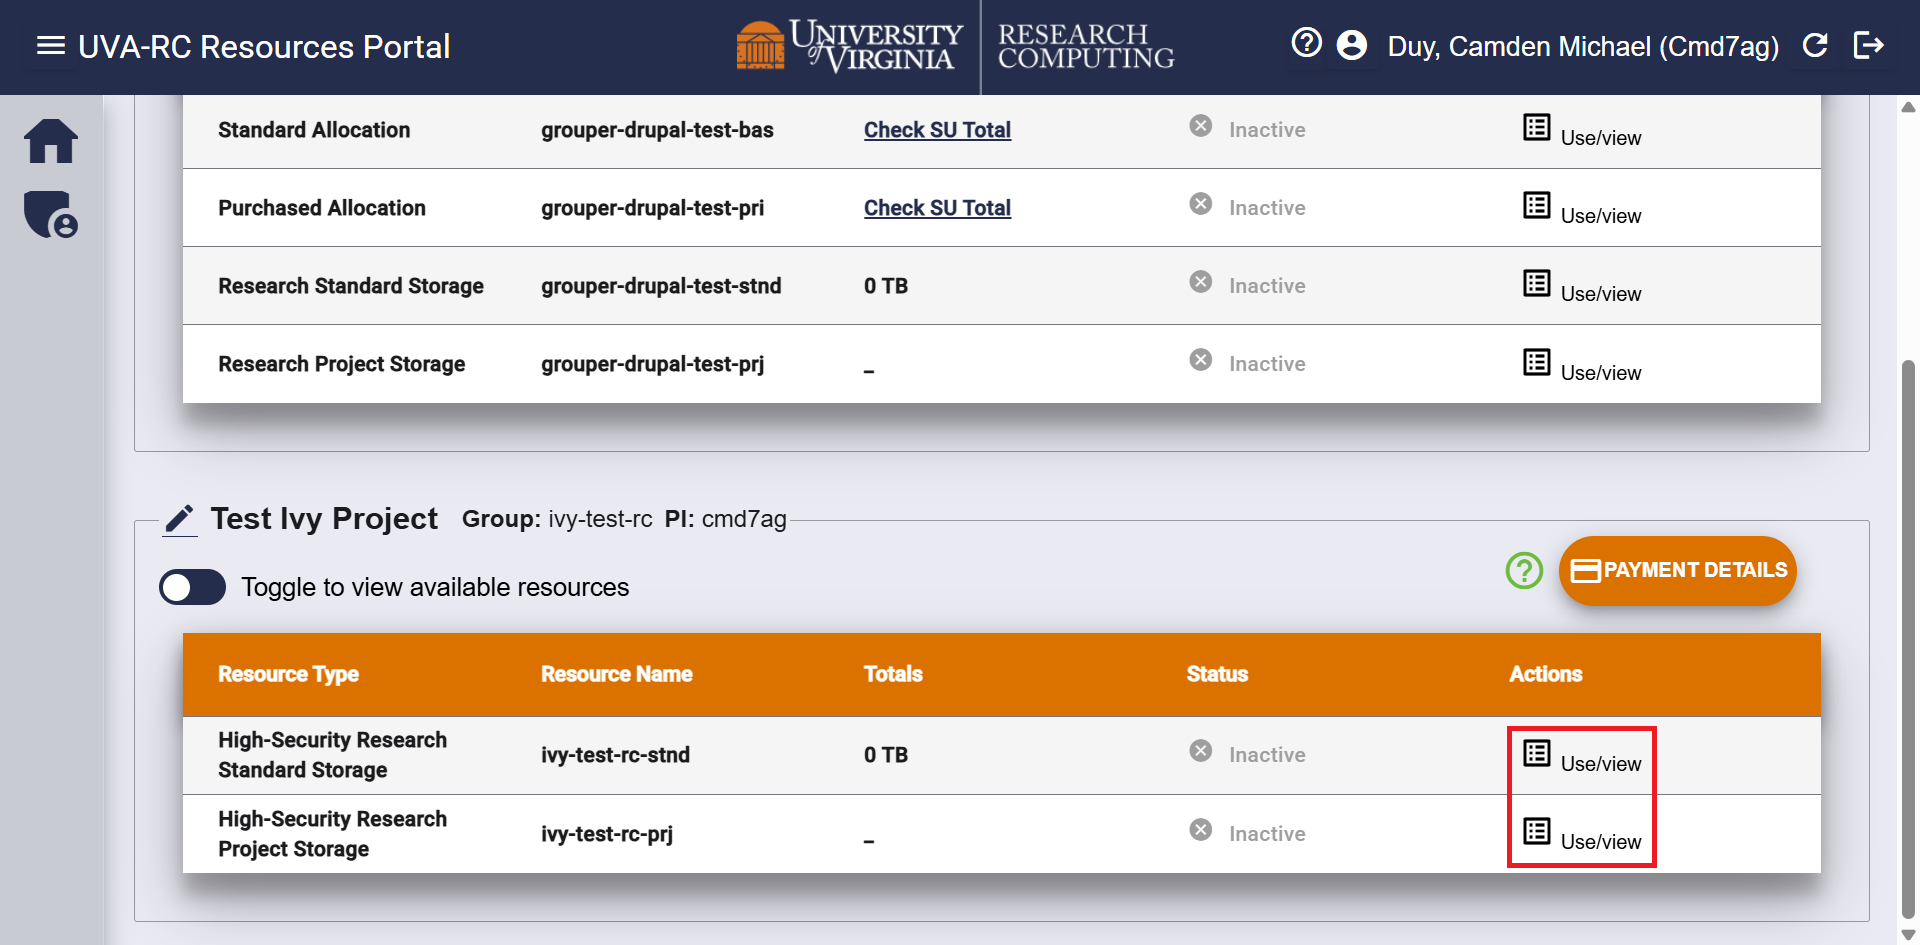
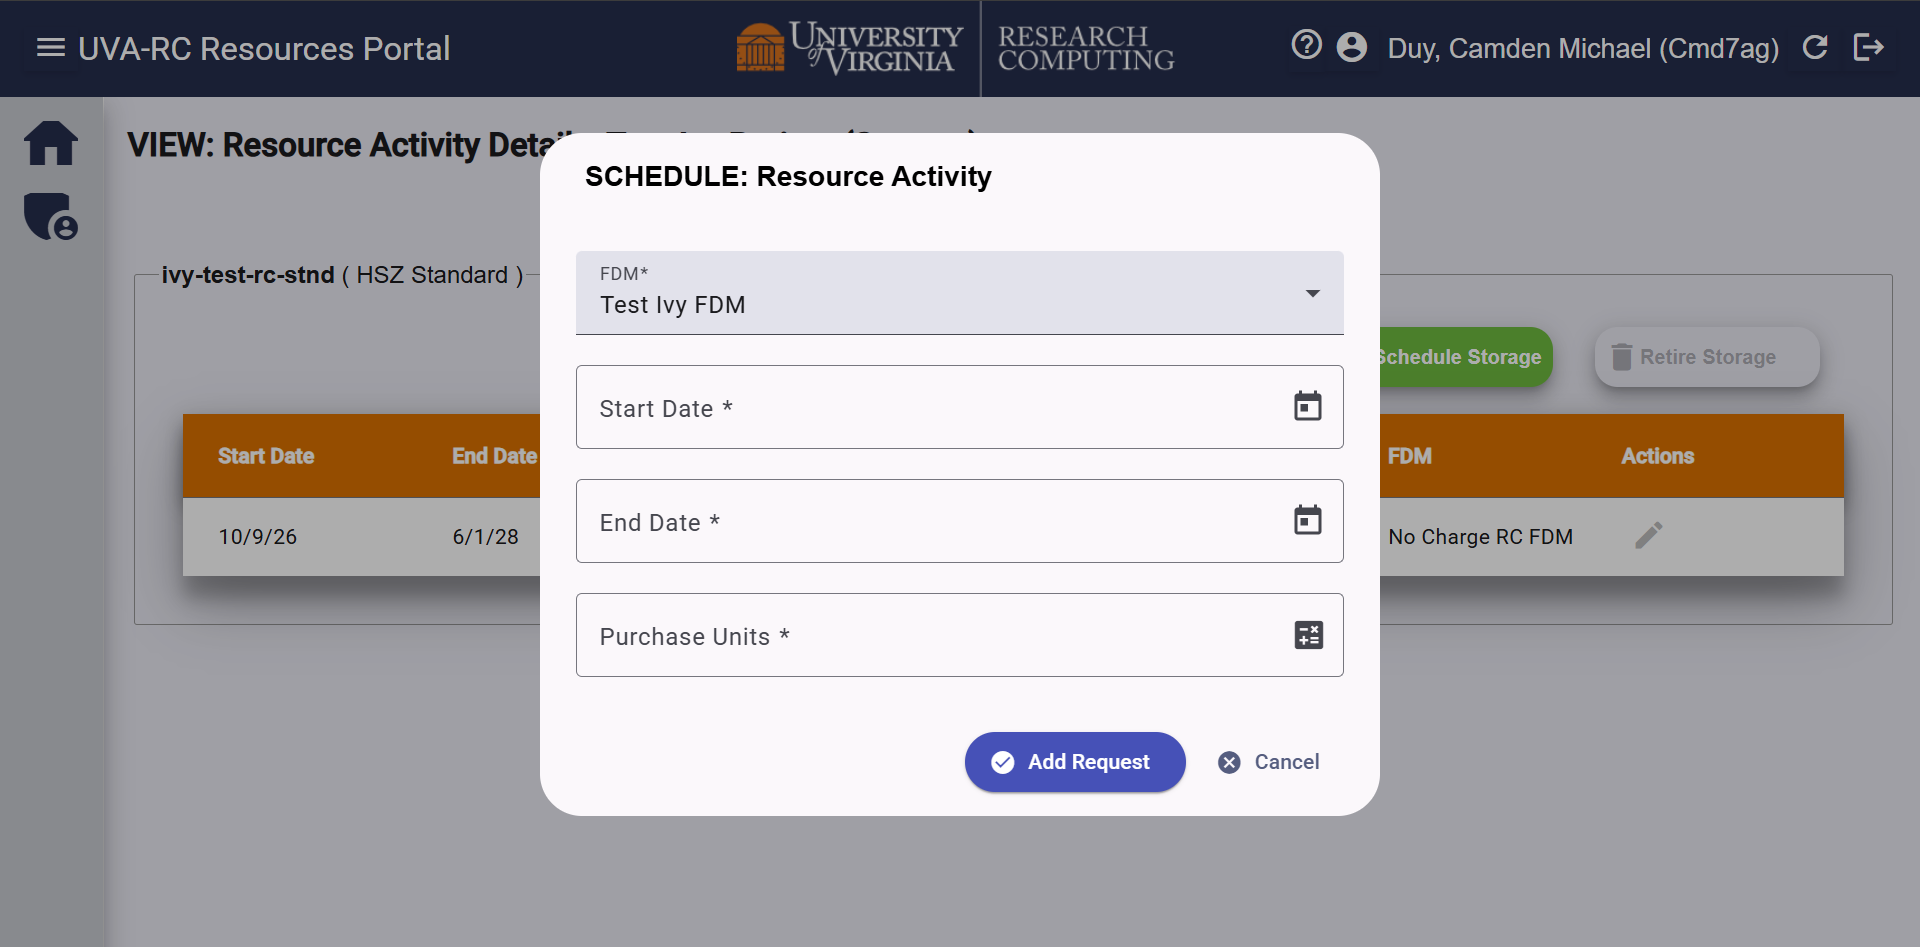
Select the green Schedule Storage button. In the form, provide the following information:
- Pick an FDM from the dropdown
- Note: All projects will have access to an FDM titled No Charge RC FDM. PIs are eligible for up to 10TB of Research Standard Storage at no cost. Use this FDM if you want to request this at no cost. The form will give you an error if you request more than 10TB, or if you have other storage using this FDM up to 10TB.
- A start date
- An end date
- Enter the amount of storage in Gigabytes (GB) you are requesting as Purchase Units
- Alternatively, you can click the calculator icon at the far right of this field. This will open a field where you can add the number in Terabytes (TB), and automatically convert the number to GB. This may be more convenient, since quota is displayed in TB on our system.
Note: All projects will have access to an FDM titled No Charge RC FDM. PIs are eligible for up to 10TB of Research Standard Storage at no cost. Use this FDM if you want to request this at no cost. The form will give you an error if you request more than 10TB, or if you have other storage using this FDM up to 10TB.
After submitting the request, it automatically generates a ticket for our user support team to verify. Once we've provisioned the storage, you will receive a notification from us, and the Status will switch to Active on the portal.
To return to the view of your project resources, click on the home icon in the left margin.
Step 4: Accessing Your Storage
You can access the storage by Logging In to your Ivy VM.